Installing & Setting Up PostgreSQL With PostGIS
Author: Dan Blomberg | Last updated January 9th, 2016 at 10:03pm
Introduction
This tutorial will guide you through the steps involved with installing PostgreSQL and PostGIS on your Windows based computer. PostGIS is a requirement for the way GPSFileDepot creates Garmin compatible maps.
Instructions
This tutorial last updated for version postgreSQL 9.5.0 and postGIS 2.1.0.
PostgreSQL
- Go the the PostgreSQL windows downloads.
- Download the installer from Enterprise DB.
- Click windows on the EnterpriseDB page and download the appropriate version for your computer (64bit or 32bit).
- Run the .exe that has been downloaded to install PostgreSQL.
- The default install directories should be good. When prompted enter a password that you can remember.
- The normal settings should be good.
- It is no longer necessary to do these steps for connecting without a password since a GUI exists for everything now; however, if you want to connect without a password perform the following:
- Make sure the "Launch Stack Builder at exit?" box is unchecked and click finish.
- Open pg_hba.conf in C:\Program Files\PostgreSQL\9.3\data with notepad or a similar document editor.
- Change the line reading:
host all all 127.0.0.1/32 md5 - to
host all all 127.0.0.1/32 trust
If you use IPv6 change the next line below it as well. - Reload the configuration files (start>all programs>postgresql X.X>Reload configuration)
- Make sure the "Launch Stack Builder at exit?" box is checked and click finish. If you did the passwordless logon then start the Application Stack Builder (in PostgreSQL's folder int he start menu).
PostGIS
- Start the Application Stack Builder (in PostgreSQL's start menu) [probably already done since that is the last step from above]
- Select your local server: (it is likely 9.5, this is an old screenshot)

- Under "Spatial Extensions" check the most recent version of PostGIS (for this tutorial we installed 2.2.1):

- Leave the download location alone and click "Next"
- After the download finishes click next to start installing.
- Make sure create spatial database is checked.
- Leave the default options. Make sure you enter your password if needed.
- Change the database name to postgis
Now you should have a fully operational postgis database.
Creating More Databases
You may, at some point, need to create more postGIS databases. In this case you need to create them with a template file.
- Open pgAdmin III
- Connect to your local server
- Right click on databases and click "New Database..."
- Enter a name for your new database
- Select the username you've been using as the owner (default is "postgres")
- For the template select "template_postgis"
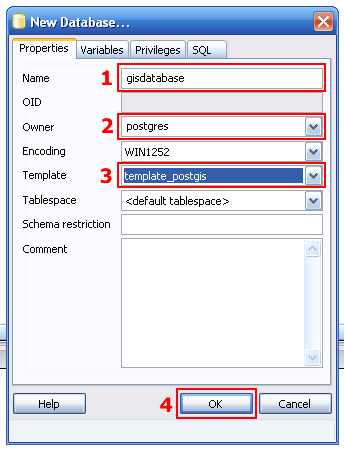
- Click okay.
A new database has now been created. You have to use a template in order to have it be a spatial database.
If you have any questions about this tutorial please contact us or post in the forums.