How To Create Garmin Topo Maps - Part 7 - Borders
Author: Dan Blomberg | Last updated January 16th, 2016 at 01:18pm
Introduction
The 7th part of this tutorial details where to download and how to process state and county borders. We already downloaded the files we need to make this happen in Part 6. Now we just have to process the data. As usual, there are two ways to do this; with QGIS or Global Mapper. If you are using QGIS just read on; if you are using Global Mapper just click here to skip to that section.
Process Borders with QGIS
State Border
- Open QGIS
- Add the GU_StateOrTerritory shapefiles that you modified in part 1 by going to Layer > Add Layer > Add Vector Layer...
- Click Vector > Geometry Tools > Polygons to Lines
- Make sure the input polygon is GU_StateOrTerritory
- Set the output shapefile to StateBorder in the borders folder
- Make sure add result to canvas is checked and hit OK
- After it is done, hit Close to close the window
- In the layers panel click on StateBorder
- Now click Table Manager

- Click on STATE_NAME and then click "Rename"
- Make the new field name NAME and click OK
- Click Save
- Click Yes
- Close the Table Manager
- Now click Field Calculator
- In the Create a new field section set the following:
Output field name to MP_TYPE
Output field type as "Text (string)"
Output field width to 10 - In the expression portion put the following:
'0x1c' - Click OK
- Click Edit and click Save

- Remove the StateBorder and the GU_StateOrTerritory layers
- Leave QGIS open; we'll use it for the county border
County Border
- With QGIS still open
- Add the GU_CountyOrEquivalent shapefiles from your federal_land folder by going to Layer > Add Layer > Add Vector Layer...
- Right click on the GU_CountyOrEquivalent in the Layers Panel and select Open Attribute Table
- Click the Edit button

- Select each record that is not the state you are working with (click the number on the far left and hold CTRL to select them all) (you can click the STATE_NAME column header to sort by state to make selecting easier).
- Click "Delete Selected Features"
- Click the Edit button again
- Click Save
- Close the attribute table
- Click Vector > Geometry Tools > Polygons to Lines
- Make sure the input polygon is GU_CountyOrEquivalent
- Set the output shapefile to CountyBorders in the borders folder
- Make sure add result to canvas is checked and hit OK
- After it is done, hit Close to close the window
- In the layers panel click on CountyBorders
- Now click Table Manager
- Click on COUNTY_NAM and then click "Rename"
- Make the new field name NAME and click OK
- Click Save
- Click Yes
- Now click Field Calculator
- In the Create a new field section set the following:
Output field name to MP_TYPE
Output field type as "Text (string)"
Output field width to 10 - In the expression portion put the following:
'0x1d' - Click OK
- Click Edit and click Save
- Close QGIS
Now that the borders are processed and ready to go you can head to the next part of the tutorial.
Process Borders with Global Mapper
State Border
- In Global Mapper open the GU_StateOrTerritory shapefile that you modified in part 1
- Click the "Digitizer Tool" button

- Click on the state
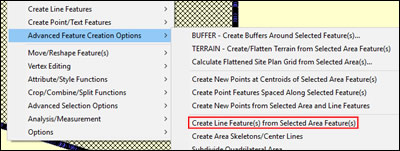
- Right click on the state and clickAdvanced Feature Creation Options>Create Line Feature(s) from Selected Area Feature(s):
- Under Feature Attributes click Add...
- For attribute name put MP_TYPE
- For Attribute value put 0x1c
- Click OK
- Now in the Feature Attributes list find STATE_NAME and click it and then "Edit..."
- Change Attribute Name to NAME
- Click OK
- Click OK
- Click File>Export Vector Data>Export Shapefile...
- Click the box for "Export Lines"
- Call the file "StateBorder" and put it in your borders folder
- Click OK
- The state boundary is now complete.
County Borders
- In Global Mapper open the GU_CountyOrEquivalent shapefile from your federal_land folder
- Click Search>Search by Attributes, Name, and Description
- Under Searh Criteria Attribute/Item select STATE_NAME
- Change = to !=
- Type in your state's name
- Click New Search
- Click Select All
- Click Delete Selected
- Close the search tab
- Click the "Digitizer Tool" button
- Drag a square around all the counties.
- Right click on the state and click Advanced Feature Creation Options>Create Line Feature(s) from Selected Area Feature(s)
- Click OK to make the lines
- Click Search>Search by Attributes, Name, and Description
- Under Select Layer(s) to search select "Search Specific Layers" and uncheck GU_CountyOrEquivalent leaving just User Created Features
- Click "New Search!"
- Click "Select All"
- Click "Edit Selected"
- Now in the Feature Attributes list find COUNTY_NAM and click it and then "Rename..."
- Type in NAME and hit OK
- Now under Feature Attributes click Add...
- For attribute name put MP_TYPE
- For Attribute value put 0x1d
- Click OK
- Click OK
- Click File>Export Vector Data>Export Shapefile...
- Click the box for "Export Lines"
- Call the file "CountyBorders" and put it in your borders folder
- Click OK
- The county boundaries are now complete.
What's Next?
Now that we have all the regular data we need we're going to combine the map data into a series of .mp files and then convert it to .img files.
<-- Previous - Federal Lands | Table Of Contents | Next - Combining -->