How To Create Garmin Topo Maps - Part 2 - Elevation Data
Author: Dan Blomberg | Last updated March 17th, 2016 at 08:13pm
Introduction
This part details how to download high-quality evalation data as either DEM (digital elevation mapping) data or pre-configured contours from the USGS National Map system. This is a continuation of the "How To" discussing how to create detailed Garmin topographic maps. In part 1 we discussed how to setup your computer to get ready to download and process the data.
Software
All the software required was mentioned in the part 1 of this tutorial. In this portion when making your own contours QGIS is substantially more time consuming in comparison to Global Mapper.
Option 1 - Use 1:24,000 Scale USGS Contours
This option involves using pre-created 1:24,000 scale USGS contours. This means the interval between the contours varies throughout a state in an attempt to keep to the 1:24,000 scale. This scale most similarly matches the printable USGS topo maps. Additionally, the USGS created these contours from the 1/3 arc-second DEM data (which is what is used if you make your own contours).
Using The National Map Viewer to Download the Data
- Open the National Map Viewer (Download version)
- First, on the left side select "Elevation Products (3DEP)
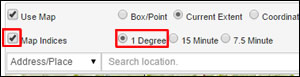
- Now check the box for Contours (1:24,000-scale) and make sure that all the DEM boxes are unchecked.
- For file format select Shapefile
- Use the map on the right to zoom until you can see your entire state.
- Check the "Map Indices" button and select 1 Degree (this will allow you to see each grid that must be downloaded).
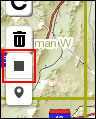
- Now use the "Draw Rectangle" function to draw a rectange that encompasses the whole state. If you have a small state or only need one degree area you can use the "Draw Point" button right below the rectangle one a put a point in the degree box.
- With the rectangle drawn (or point) click Find Products in the left pane.
- Once the list loads click the "Add Entire Page To Cart". If you only have one or two files you can skip the cart and just click download for each one.

- Now click view cart (at the top)
- From here you can either "List & Export Cart Items" which will give you a csv (open in Excel or similar) with links to all the downloads and can be used with the USGS National Map Download Manager OR you can click download for each file. I clicked download and then remove so that I knew which files I downloaded already.
- If you are going to use The National Map Download Manager get it here.
- Open the Download Manager (either via the launch button or by downloading and opening the .jar).
- Click File>Import and import the .csv file
- After it finishes preparing (you should see MB sizes for every file along the right side click Start All
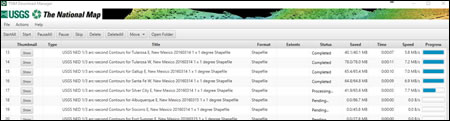
- You can then click open folder to access where the files are downloaded.
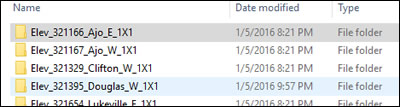
- Once you have all the files downloaded extract the data from the zip file into its own folder. It should look similar to this:
- You are now ready to process the data.
Processing the Contour Data
In this section we will combine all the contours together, set the MP_TYPE information that is required for Garmin maps, and cut the contours off at the border of the state.
Combine All The Contours Together
- First we will combine all the contours into one file. We have created a batch file that you can run and it will use FWTools to combine the contours. Download the bat file here and extract it.
- Edit the bat file in Notepad (right click and click "Edit")
- On the first line change the folder to be the folder where you have all the folders containing the contour lines folders.
- On the second line set your location to the FWTools bin folder (the default for 2.4.7 on a 64-bit OS is already set)
- Save the file
- Now double click on the bat file to combine all the contours together. Note: Currently FWTools will crash if the file gets over 4gb; if this occurs you must split your contours into two separate folders and combine each half of the state separately. For reference: for Arizona the file was only 3gb.
- A new file has been created called "mergedcontours.shp"
Global Mapper
As of yet I have not come up with an easy way to have Global Mapper do the data manipulation required to set the MP_TYPE. While this is doable in PostGIS, I currently recommend you use QGIS and the instructions below.
QGIS
- Open QGIS and add the vector layer "mergedcontours.shp" by going to Layer > Add Layer > Add Vector Layer...
- Open Table Manager (plugin that you installed in Part 1); the button by default is at the bottom of the left menu. (this can take a little bit to open due to the size of the file)

- Select the following columns (hold CTRL and click each): DATA_SECUR, CONTOURUNI, DISTRIBUTI, SOURCE_DAT, SOURCE_ORI, LOADDATE, PERMANENT_, SOURCE_FEA, SOURCE_D_1 and click Delete.
- Click Yes to confirm.
- Click Save
- Click Yes, even though we haven't used layer styles it makes sense to not change anything.
- Click Close
- Click field calculator (you can also do this via the attribute table but it makes the process longer due to the required refresh of each column).
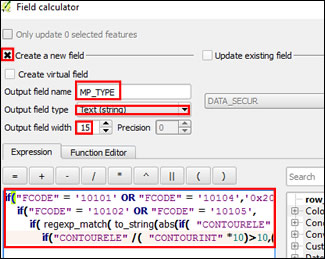
- In the Create a new field section set the following:
Output field name to MP_TYPE
Output field type as "Text (string)"
Output field width to 15 - In the expression portion put the following (most of the large if statement is taking the USGS index contours and making an intermediate one and a major one):
if("FCODE" = '10101' OR "FCODE" = '10104','0x20',
if("FCODE" = '10102' OR "FCODE" = '10105',
if( regexp_match( to_string(abs(if( "CONTOURELE" /( "CONTOURINT" *10)>100, ("CONTOURELE" /( "CONTOURINT" *10))/100- to_int( ("CONTOURELE" /( "CONTOURINT" *10))/100),
if("CONTOURELE" /( "CONTOURINT" *10)>10,("CONTOURELE" /( "CONTOURINT" *10))/10- to_int( ("CONTOURELE" /( "CONTOURINT" *10))/10),"CONTOURELE" /( "CONTOURINT" *10)- to_int( "CONTOURELE" /( "CONTOURINT" *10)))))),'5'),'0x21','0x22'),NULL))
- Click OK (let it run, it could take a few minutes)
- Now open the field calculator again.
- In the Create a new field section set the following:
Output field name to NAME
Output field type as "Text (string)"
Output field width to 10 - In the expression portion put the following:
to_string( to_int( "CONTOURELE" )) - Click OK
- Click the edit button and then click Save when it prompts you.

- Add the vector layer GU_StateOrTerritory.shp file modified back in part 1 (Layer > Add Layer > Add Vector Layer...)
- Go to Vector > Geoprocessing Tools > Clip
- For the input layer select mergedcontours and for the clip layer select GU_StateOrTerritory
- For output file hit Browse and call the file contoursfinal
- Click OK. This could take a long time so be patient.
- The elevation shapefile now contains all the information required for MP files and is ready for conversion later during this tutorial.
Option 2: Creating Your Own Contours
If you don't want to use the 1:24k contours provided by the USGS you can easily create your own contours. Prior to mid-2015 this was the only option. The advantage to this is you can control the contour interval; the disadvantage is it takes more time to process and you will have the same interval across the entire dataset.
Using The National Map Viewer to Download the Data
- Open the National Map Viewer (Download version)
- First, on the left side select "Elevation Products (3DEP)
- Now check the box 1/3 arc-second DEM. If 1/9 arc-second is available you can use that instead for higher fidelity.
- For file format select ArcGrid (while Grid Float works with Global Mapper and is viewable with QGIS it doesn't work with some of the other software components).
- Use the map on the right to zoom until you can see your entire state.
- Check the "Map Indices" button and select 1 Degree (this will allow you to see each grid that must be downloaded).
- Now use the "Draw Rectangle" function to draw a rectange that encompasses the whole state. If you have a small state or only need one degree area you can use the "Draw Point" button right below the rectangle one a put a point in the degree box.
- With the rectangle drawn (or point) click Find Products in the left pane.
- Once the list loads click the "Add Entire Page To Cart". If you only have one or two files you can skip the cart and just click download for each one.
- Now click view cart (at the top)
- From here you can either "List & Export Cart Items" which will give you a csv (open in Excel or similar) with links to all the downloads and can be used with the USGS National Map Download Manager (I did not get this to work) OR you can click download for each file. I clicked download and then remove so that I knew which files I downloaded already.
- Once you have all the files downloaded extract the data from the zip file into its own folder.
- You are now ready to process the data.
Processing The Data
This section has directions for using Global Mapper or QGIS software to create contours from the DEM data.
Global Mapper Directions
- Start Global Mapper
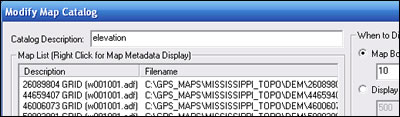
- Go to File> Create new map catalogue
- Go to your state's folder (i.e. mississippi_topo) then the dem folder. Save the map catalouge as elevation.gmc
- In the next box that appears select "Add Directory"
- Select the dem directory in your state's folder.
- For file masks enter: w001001.adf
- Press "Ok" and you should get a window with a bunch of w001001.adf files similar to this:
- Press "Ok" and all the DEM files will load. They will not really be visible because of the setting to not show unless the segment takes up 10% of the screen.
- Now we are going to process the contours and export them in one operation. This operation could take as long as 36 hours depending on your computer and state (the Grand Canyon took 4+ hours on its own). Click Analysis> generate contours.
- For contour internal enter 40 ft.
Note: For Mississippi I am using 10-20ft contour intervals because that is what the 24k maps have and the state is relatively flat. - For resolution under x-axis enter: 0.000104605841386575
- For resolution under y-axis enter: 0.000081169112836251
Entering these resolution values appears to give a good smoothness versus size ratio. - Make sure interpolate and smooth contours are checked. Uncheck Append Unit Labels to elevations.
- Check export contours directly to package files.
- Now go to the gridding tab on the top. If you have a very mountanous state I would recommend sticking to the 100k quad size so that the segments can be used in older GPS receivers. If you have a very flat state you can go larger. The 100k segment size is: 1 arc degree in width and 0.5 arc degree in height. For flat states you can use 1 arc degree by 1 arc degree.
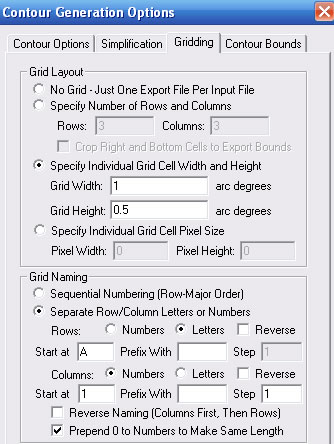
- Click "Ok" and call the files contours
- Let it process.
- If your computer crashes or you stop processing open the catalogue we created and then check the box under gridding that says "skip existing files". This will allow Global Mapper to start off where it ended.
QGIS
QGIS is a free and open source GIS program. It will allow you to process elevation data for free. This tutorial was created with QGIS 2.12.2. This method is slower because at this time each raster file (degree area) has to be processed separately. This portion is unfinished, estimated completion is late May 2016.
- In QGIS click the Layer Menu then Add Raster Layer.
- If you downloaded the GridFloat file select the .flt file from each folder or for ArcGrid select w001001.adf.
- For each input file you have to create a set of contours
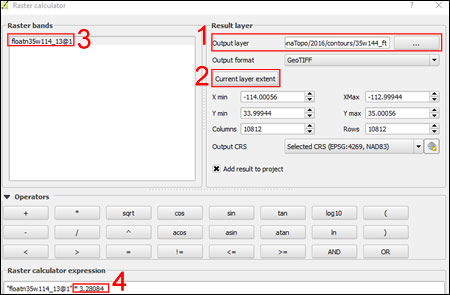
- The DEM files are in meters so we need to convert them to feet. Select Raster > Raster Calculator.
- Select the output file and leave the format as GeoTIFF.
- Click current layer extent.
- Double click the raster band.
- For the formula add to the expression
* 3.28084
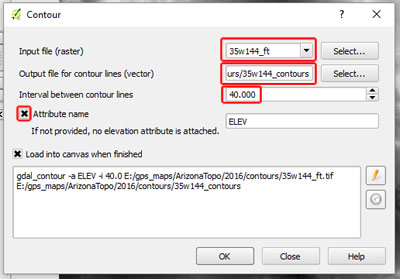
- Now that it has been converted you can select the Raster > Extraction > Contour
- Check the "Attribute Name" box so that your elevation data is included.
- For contour internal enter a value such as 40 ft.
Note: For Mississippi I am using 10-20ft contour intervals because that is what the 24k maps have and the state is relatively flat. - Click "OK"
Note: The command in the white box is a command to execute the contour program; you can use this to create a batch file for multiple runs.
- Repeat this for all the files you have downloaded, export each one into its own shapefile.
- Next we will need to handle the MP_TYPE requirement; that portion will be added by the end of Jan 2016.
What's Next?
Now that our contour data is all downloaded and processed we will start downloading the water data. This process also used to be time consuming but the National Map Viewer has greatly improved it.
<-- Previous - Setup | Table Of Contents | Next - Water Data -->